基于VuePress搭建博客系统及优化过程(持续更新...)
- 使用 vuepress,基于 vuepress-theme-reco 搭建个人博客系统
- 基于 GitHub Pages 自动部署
- 基于 vuepress 个人博客的优化历程 以及 问题解决方案
# 优化历程
| 时间 | 优化内容 |
|---|---|
| 2022.05.23 | 【vssue (opens new window)】出现bug,将评论插件改为【valine (opens new window)】 |
| 2022.03.09 | 新增插件【code-copy】、【copyright】、【sitemap】 |
| 2022.03.09 | 解决github pages部署时,报错:JavaScript heap out of memory |
| 2022.03.05 | 配置 【友盟+ (opens new window)】的【网站统计U-Web】,实现网站底部的【站点统计】功能 |
| 2022.03.05 | 解决 博客仓库的README 与 vuepress的首页README 不兼容问题 |
| 2022.02.08 | 解决 永久连接的中文路由 问题,移除插件[permalink-pinyin] |
| 2022.01.25 | 配置[百度统计] |
| 2022.01.24 | 配置[pwa刷新]、[vssues评论]、[meting音乐]、[permalink-pinyin支持中文文件名]插件 |
| 2022.01.22 | 迁移 CSDN 和 之前基于 typecho 搭建的个人博客的 优质文章 |
| 2022.01.20 | 基于 vuepress-theme-reco (opens new window) 搭建博客(启用之前的 typecho博客) |
# 本地搭建
直接基于主题 vuepress-theme-reco (opens new window) 进行搭建。
# 执行初始化命令
方式一:npx
npx @vuepress-reco/theme-cli init
npx @vuepress-reco/theme-cli init [文件夹名字]
2
方式一:npm
npm install @vuepress-reco/theme-cli -g theme-cli init
npm install @vuepress-reco/theme-cli -g theme-cli init [文件夹名字]
2
注意:init 后可以直接加文件夹根目录,避免初始化时需要再次生成目录(不创建目录执行,会发生些报错)。

上图这个步骤,What style do you want your home page to be? 有三个选项,分别是:
- blog(推荐)
- doc(和blog几乎一致,只不过
init执行中输入的信息未应用,存在一些问题) - 2.x(目前还不成熟)
三个版本测试的时间为:2022.01.18
# 安装依赖
cd [文件夹名字]
npm install
2
# 本地运行
npm run dev
# .vuepress/config.js 配置
# 修改静态文件输出目录
在 vuepress-theme-reco 主题中,"dest" 的值为public;在 vuepress 官方中,"dest" 的值为.vuepress/dist。
这个值意为,执行 npm run build 后,静态资源目录生成的位置,会影响到后边GitHub Actions的配置。
这里我们将"dest" 的值为.vuepress/dist。
# 部署上线
# 方式一:GitHub Actions 自动部署
主分支存放代码,gh-pages 用于展示内容。
# 设置 Secrets
后面部署的 Action 需要有操作你的仓库的权限,因此提前设置好 GitHub personal access(个人访问令牌)。
生成教程可以看 GitHub 官方的帮助文档:创建用于命令行的个人访问令牌 (opens new window) (opens new window)。
授予权限的时候只给 repo 权限即可。

令牌名字一定要叫:ACCESS_TOKEN,这是后面的 Action 需要用的。

# 编写 workflow 文件
持续集成一次运行的过程,就是一个 workflow(工作流程)。
创建.github/workflows/main.yml文件,内容如下:
name: Deploy GitHub Pages

# 触发条件:在 push 到 master 分支后
on:
   push:
      branches:
         - main

# 任务
jobs:
   build-and-deploy:
      # 服务器环境:最新版 Ubuntu
      runs-on: ubuntu-latest
      steps:
         # 拉取代码
         - name: Checkout
           uses: actions/checkout@v2
           with:
              persist-credentials: false

         # 生成静态文件(export NODE_OPTIONS=--max_old_space_size=4096  解决JavaScript heap out of memory问题)
         - name: Build
           run: npm install && export NODE_OPTIONS=--max_old_space_size=4096 && npm run build

         # 部署到 GitHub Pages
         - name: Deploy
           uses: JamesIves/github-pages-deploy-action@releases/v3
           with:
              ACCESS_TOKEN: ${{ secrets.ACCESS_TOKEN }}
              BRANCH: gh-pages
              FOLDER: .vuepress/dist # 静态资源目录
2
3
4
5
6
7
8
9
10
11
12
13
14
15
16
17
18
19
20
21
22
23
24
25
26
27
28
29
30
31
需要了解 workflow 的基本语法可以查看官方帮助 (opens new window) (opens new window),也可以参考阮一峰老师的 GitHub Actions 入门 (opens new window)
具体参看文章:使用 GitHub Actions 自动部署博客 (opens new window)
# 设置GitHub Pages
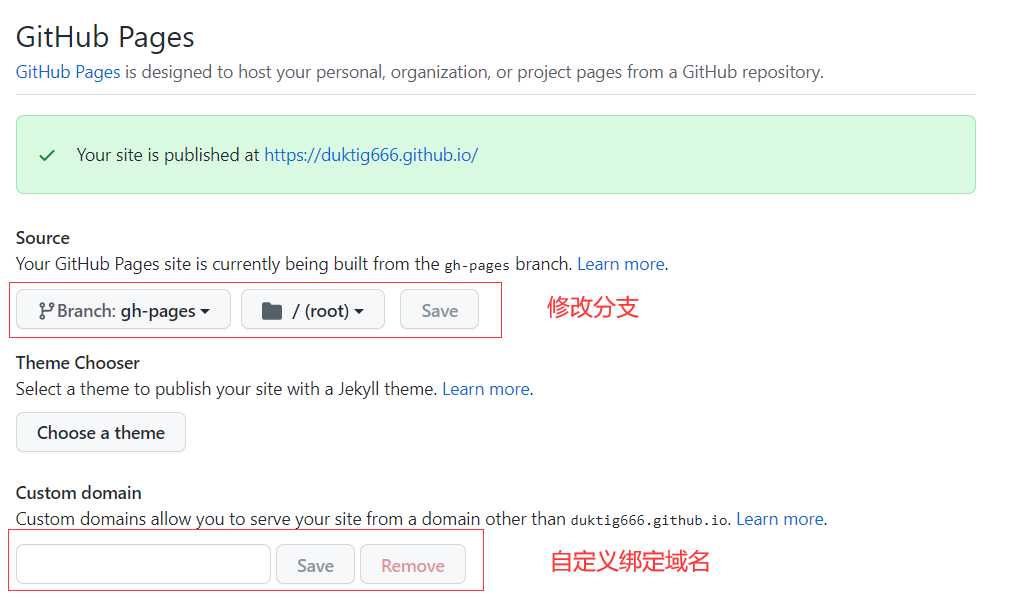
# 方式二:两个仓库
# 新建仓库一: USERNAME.github.io (不用克隆到本地)
USERNAME 必须是你 Github 的账号名称,这个仓库用来展示博客。
# 新建仓库二:随便起一个名字,比如:vuepressBlog (克隆到本地)
这个项目是用来开发博客的,以后只需要改这个项目就够了。
创建部署脚本:
#!/usr/bin/env sh

# 确保脚本抛出遇到的错误
set -e

# 生成静态文件
npm run build

# 进入生成的文件夹
cd docs/.vuepress/dist

# 如果是发布到自定义域名
# echo 'www.yourwebsite.com' > CNAME

git init
git add -A
git commit -m 'deploy'

# 如果你想要部署到 https://USERNAME.github.io
git push -f git@github.com:USERNAME/USERNAME.github.io.git master

# 如果发布到 https://USERNAME.github.io/<REPO>  REPO=github上的项目
# git push -f git@github.com:USERNAME/<REPO>.git master:gh-pages

cd -
2
3
4
5
6
7
8
9
10
11
12
13
14
15
16
17
18
19
20
21
22
23
24
25
修改仓库二中的 deploy.sh 发布脚本,把文件中的 USERNAME 改成 Github 账号名。
这样仓库二和仓库一就建立了关联。
简单说二者的关系是:仓库一负责显示网站内容,我们不需要改动它;日常开发和新增内容,都在仓库二中,并通过 npm run deploy 命令,将代码发布到仓库一。
# 在 package.json 文件夹中添加发布命令
"scripts": {
"deploy": "bash deploy.sh"
}
2
3
# 运行发布命令
npm run deploy
# 添加自定义域名
在仓库一 USERNAME.github.io 中找到 Settings > Custom domain 把 域名 添加进去即可。
具体参看文章:手把手教你使用 VuePress 搭建个人博客 (opens new window) (文中含有部署相关)
# vuepress-theme-reco 主题优化
# 代码块样式选择
// .vuepress/config.js

module.exports = {
   theme: 'reco',
   themeConfig: {
      /**
       * support for
       * 'default'
       * 'funky'
       * 'okaidia'
       * 'solarizedlight'
       * 'tomorrow'
       */
      codeTheme: 'tomorrow' // default 'tomorrow'
   }
}
2
3
4
5
6
7
8
9
10
11
12
13
14
15
16
参看:prism代码高亮主题风格展示阁 (opens new window)
vuepress-theme-reco (opens new window) 1.6.10版本,设置代码样式失效,详情参看:issues#397 (opens new window)
# 评论系统
评论系统可以使用 Valine 或 Vssue。
两者对比:
Valine
支持的功能更多。比如邮件提醒、文章阅读量统计(文章多的时候会影响一定的性能)、自定义表情等。
使用的是Gravatar (opens new window) 作为评论列表头像,需用户注册和配置。
样式预览:
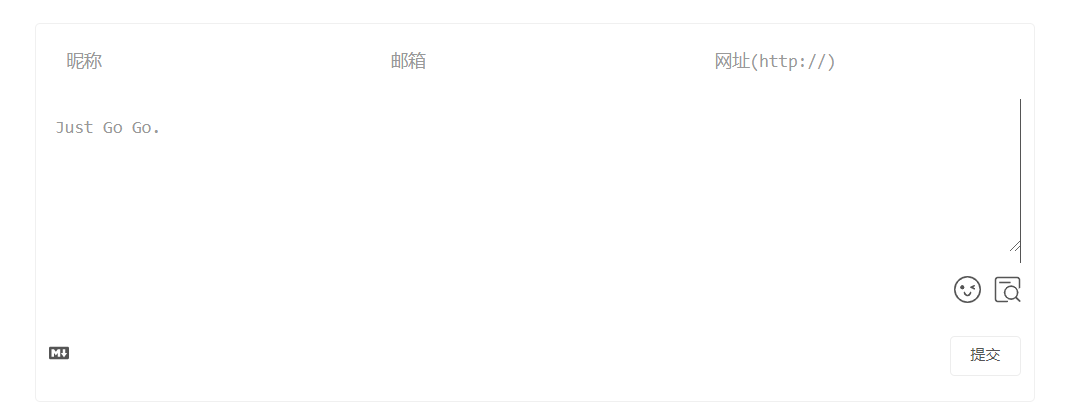
Vssue
- 最大的特性是支持 GitHub 登录。
- 基于 Issues 实现的评论系统。
这里暂时先使用 Vssue 搭建评论系统,详情可参看:
# PWA 刷新插件
安装
npm install -D @vuepress/plugin-pwa
使用
本选项开启了一个用于刷新内容的弹窗。这个弹窗将会在站点有内容更新时显示出来,并提供了一个 refresh 按钮,允许用户立即刷新内容。
如果没有“刷新”按钮,则只有在所有的 Clients (opens new window) (opens new window)被关闭后,新的 Service Worker 才会处于活动状态。这意味着用户在关闭你网站的所有标签之前无法看到新内容。但是
refresh按钮会立即激活新的 Service Worker。
['@vuepress/pwa', {
   serviceWorker: true,
   updatePopup: {
      message: "发现新内容可用",
      buttonText: "刷新"
   }
}],
2
3
4
5
6
7
# 音乐播放器插件
音乐插件选用:meting (opens new window)
// 音乐插件
['meting', {
   //metingApi: "https://meting.sigure.xyz/api/music",
   meting: {
      // 网易
      server: "netease",
      // 读取歌单
      type: "playlist",
      mid: "696441716",
   },
   // 不配置该项的话不会出现全局播放器
   aplayer: {
      // 吸底模式
      fixed: true,
      mini: true,
      // 自动播放
      autoplay: true,
      // 歌曲栏折叠
      listFolded:true,
      // 颜色
      theme: '#f9bcdd',
      // 播放顺序为随机
      order: 'random',
      // 初始音量
      volume: 0.1,
      // 关闭歌词显示
      lrcType: 0
   },
   mobile :{
      // 手机端去掉cover图
      cover: false,
   }
}]
2
3
4
5
6
7
8
9
10
11
12
13
14
15
16
17
18
19
20
21
22
23
24
25
26
27
28
29
30
31
32
33
# 添加百度统计代码
参看:VuePress 添加百度统计代码 (opens new window)
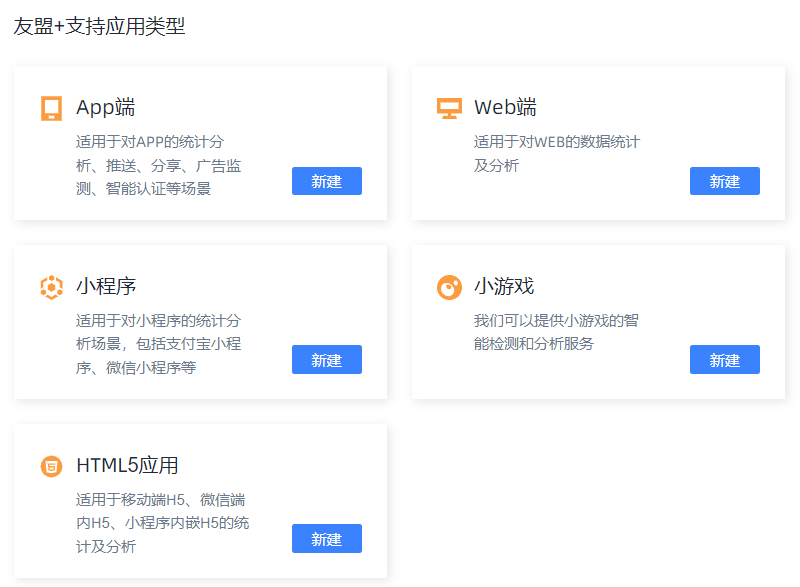
# 网站底部添加——友盟+ U-Web站点统计
样式如下:

步骤1:注册【友盟+ (opens new window)】
步骤2:创建对应客户端的应用
步骤3:在【应用】->【站点设置】中获取对应的代码

步骤4:将id和src进行解码
可以在浏览器的控制台中直接执行 unescape(内容省略),然后获取id和src。
步骤5:新建如下两个文件
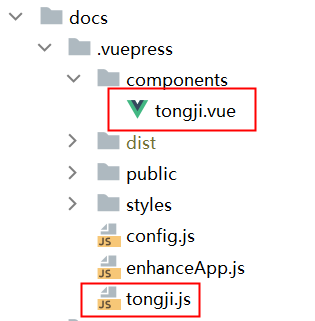
tongji.js中,将id和src的值修改成自己的
export default {
    init() {
        const tj = document.querySelector('#cnzz');
        const span = document.createElement("span");
        span.id = "cnzz_stat_icon_1280930000";
        const script = document.createElement("script");
        script.src =
            "https://s4.cnzz.com/z_stat.php?id=1280930000&online=1&show=line";
        script.type = "text/javascript";
        tj.append(span);
        tj.append(script);
        // 只在首页展示
        const hidden = location.pathname !== "/";
        if (hidden) {
            tj.className += ' hidden-tj'
        } else {
            tj.className += ' home-tj'
        }
    }
}
2
3
4
5
6
7
8
9
10
11
12
13
14
15
16
17
18
19
20
tongji.vue
<template>
   <div id="cnzz" class="tj"></div>
</template>
<script>
export default {
   mounted() {
      import("./../tongji").then((res) => {
         res.default.init();
      });
   },
};
</script>
<style lang="css">
#cnzz_stat_icon_1280934766 {
   padding: 1rem 0;
   display: flex;
   flex-wrap: wrap;
   justify-content: center;
   font-size: 12px;
}
.hidden-tj {
   position: absolute;
   width: 0;
   height: 0;
   opacity: 0;
}
.home-tj {
   position: absolute;
   left: 0;
   right: 0;
   bottom: -100px;
}
@media (max-width: 719px) {
   .home-tj {
      position: absolute;
      left: 0;
      right: 0;
      bottom: -200px;
   }
}
</style>
2
3
4
5
6
7
8
9
10
11
12
13
14
15
16
17
18
19
20
21
22
23
24
25
26
27
28
29
30
31
32
33
34
35
36
37
38
39
40
41
在首页的README.md中因为自定的组件:
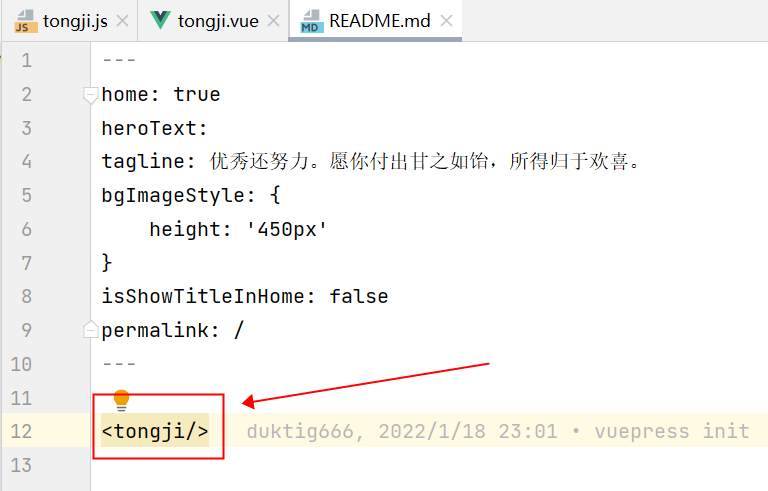
配置完成!
# 添加Copy自动加版权信息插件
复制你网站时,禁用复制或者添加版权信息等。
安装
npm install vuepress-plugin-copyright
配置
// .vuepress/config.js
module.exports = {
  plugins: [
    [
      'copyright',
      {
        noCopy: true, // 选中的文字将无法被复制
        minLength: 100, // 如果长度超过 100 个字符
      },
    ],
  ],
}
2
3
4
5
6
7
8
9
10
11
12
效果, 拷贝本页面会自动添加:
著作权归 xxxx 所有。
链接:https://www.pdai.tech/md/about/blog/blog-build-vuepress.html
2
更多请参考插件:vuepress-plugin-sitemap (opens new window)
# 添加代码拷贝
在代码区,添加一个拷贝按钮,用来拷贝代码。
安装
npm install vuepress-plugin-code-copy
配置
module.exports = {
    plugins: [['vuepress-plugin-code-copy', true]]
}
2
3
更多请参考插件:vuepress-plugin-code-copy (opens new window)
# 添加Sitemap信息
著作权归https://pdai.tech所有。 链接:https://www.pdai.tech/md/about/blog/blog-build-vuepress.html
主要用于生成站点的Sitemap,有助于SEO。
安装
npm install vuepress-plugin-sitemap
配置
// .vuepress/config.js
module.exports = {
  plugins: {
    'sitemap': {
      hostname: 'https://www.duktig.cn'
    },
  }
}
2
3
4
5
6
7
8
更多请参考插件:vuepress-plugin-sitemap (opens new window)
# 好用的MarkDown扩展语法
完整的md扩展,参看:https://vuepress.vuejs.org/zh/guide/markdown.html (opens new window)
# GitHub 风格的表格
输入
| Tables        | Are           | Cool  |
| ------------- |:-------------:| -----:|
| col 3 is      | right-aligned | $1600 |
| col 2 is      | centered      |   $12 |
| zebra stripes | are neat      |    $1 |
2
3
4
5
输出
| Tables | Are | Cool |
|---|---|---|
| col 3 is | right-aligned | $1600 |
| col 2 is | centered | $12 |
| zebra stripes | are neat | $1 |
# Emoji
输入
:tada: :100:
输出
🎉 💯
你可以在这个列表 (opens new window) (opens new window)找到所有可用的 Emoji。
# 目录
[[toc]]
# 自定义容器 (默认主题)
输入
::: tip
这是一个提示
:::

::: warning
这是一个警告
:::

::: danger
这是一个危险警告
:::

::: details
这是一个详情块,在 IE / Edge 中不生效
:::
2
3
4
5
6
7
8
9
10
11
12
13
14
15
# 代码块中的行高亮
输入
``` js {4}
export default {
  data () {
    return {
      msg: 'Highlighted!'
    }
  }
}
```
2
3
4
5
6
7
8
9
以上例子会在 第四行代码 加高亮显示。
除了单行以外,你也可指定多行,行数区间,或是两者都指定。
- 行数区间: 例如
{5-8},{3-10},{10-17} - 多个单行: 例如
{4,7,9} - 行数区间与多个单行: 例如
{4,7-13,16,23-27,40}
# 衡量网站评分
参看:https://web.dev/measure/ (opens new window)
# 问题及解决
# 1. md文件名有中文不能正常路由跳转?
# 方法一:添加文件.vuepress/enhanceApp.js(推荐)
添加文件.vuepress/enhanceApp.js (opens new window),写入以下内容
以下代码废弃,在vuepress-theme-reco 版本为 1.6.10 使用这种方式依然没有解决问题。export default ({ router, // 当前应用的路由实例 }) => { // 解决中文路由无法被正确加载的问题 router.beforeEach((to, from, next) => { if (decodeURIComponent(to.path) !== to.path) { return next({ ...to, path: decodeURIComponent(to.path), fullPath: decodeURIComponent(to.fullPath) }) } next() }) }1
2
3
4
5
6
7
8
9
10
11
12
13
14
15
换成如下代码,可临时解决1.6.10版本中文路由问题:
export default (ctx) => {
  const routes = ctx.router.getRoutes()

  ctx.router.beforeEach((to, from, next) => {
    // 解决decode后反复重定向的问题
    const route = routes.find((v) => v.regex.test(to.path))

    // .html有重定向路由,无需特殊处理
    if (/\.html$/.test(to.path)) {
      return next()
    }

    // 不特殊处理 非通配符的 没有重定向的路由
    if (route && route.path !== '*' && !route.redirect) {
      return next()
    }

    // 解决中文标签/分类路由无法被正确加载的问题
    if (decodeURIComponent(to.path) !== to.path) {
      return next(
        Object.assign({}, to, {
          path: decodeURIComponent(to.path),
          fullPath: decodeURIComponent(to.fullPath)
        })
      )
    }

    next()
  })

  // 临时解决,防止内部调用钩子再处理
  ctx.router.beforeEach = () => {
    return
  }
}
2
3
4
5
6
7
8
9
10
11
12
13
14
15
16
17
18
19
20
21
22
23
24
25
26
27
28
29
30
31
32
33
34
35
此问题详情参看:https://github.com/vuepress-reco/vuepress-theme-reco/issues/395 (opens new window)
# 方法二:使用插件 vuepress-plugin-permalink-pinyin
但是原有的中文路由会转为拼音
当文件名含有中文时,对应页面无法跳转,可通过如下插件解决这个问题,这个插件会将中文路径转换为拼音路径
本地安装:
npm install -D vuepress-plugin-permalink-pinyin
然后配置插件:
module.exports = {
  plugins: [
      // 支持中文文件名
      [
        "permalink-pinyin",
        {
          lowercase: true, // Converted into lowercase, default: true
          separator: "-", // Separator of the slug, default: '-'
        },
      ],
  ]
}
2
3
4
5
6
7
8
9
10
11
12
vuepress-theme-reco 1.6.10 配置如下 永久链接格式,会导致插件 vuepress-plugin-permalink-pinyin 中文路由转拼音失效
module.exports = {
    permalink: "/:year/:month/:day/:slug",
};
1
2
3
参看:https://github.com/vuepress-reco/vuepress-theme-reco/issues/395 (opens new window)
# 2. 文章一级标题不在目录中显示
在 vuepress-theme-reco 中,请摒弃一级标题,使用 front-matter 生成标题以及其他文章信息,正文从二级标题开始。
# 3. 博客首页 与 git仓库首页的 README.md 不兼容
参看文章:vuepress-theme-reco@1.x 解决博客首页 与 仓库README不兼容问题 (opens new window)
# 4. github pages 部署时JS内存溢出
详细报错如下:
FATAL ERROR: CALL_AND_RETRY_LAST Allocation failed - JavaScript heap out of memory
解决:
安装插件:npm install -g increase-memory-limit
修改giuhub的部署脚本:
主要修改如下这段代码:
# 生成静态文件
- name: Build
run: npm install && export NODE_OPTIONS=--max_old_space_size=4096 &&npm run build
2
3
windows环境使用命令set NODE_OPTIONS=--max_old_space_size=4096,因为export是linux的命令。
# 参看
- vuepress-theme-reco (opens new window)
- VuePress (opens new window)
- 手把手教你使用 VuePress 搭建个人博客 (opens new window) (文中含有部署相关)
- 使用 GitHub Actions 自动部署博客 (opens new window)
- 从hexo到vuepress (opens new window)
- vuepress-theme-reco个人向优化 (opens new window)
- actions自动化:vuepress构建,github同步gitee,giteepage部署 (opens new window)
- vuepress reco主题优化与修改 (opens new window)